Did you know that nearly 70% of homeowners experience issues with their water heaters at some point? If you’re in El Cajon, CA, and facing a malfunction, you’re not alone. Knowing how to troubleshoot can save you time and money. From checking the power supply to identifying leaks, there are several practical steps you can take before calling for help. When you need expert assistance, having access to trusted professional plumbing services in El Cajon, CA, ensures you get the help you need quickly. Let’s investigate these tips to get your hot water flowing again.
Check the Power Supply
Have you checked the power supply? Before diving into any complicated repairs, make certain your water heater’s power source is functioning properly.
If it’s electric, inspect the circuit breaker and verify it hasn’t tripped. If it has, reset it and see if that solves the issue. You should additionally verify that the power cord is securely connected and free from damage.
For gas water heaters, check the gas valve to confirm it’s open. If you smell gas, turn off the valve immediately and contact a professional.
Don’t overlook the thermostat; it could be set too low.
Finally, inspect any fuses associated with the water heater. If you find a blown fuse, replace it and monitor the situation.
Addressing power supply issues is vital before moving on to more complex problems, so take this step seriously to avoid unnecessary frustration.
Inspect the Thermostat Settings
Before diving deeper into repairs, it’s important to inspect the thermostat settings on your water heater. This step can often resolve issues without further complications.
Here’s what you should check:
- Temperature Setting: Confirm the temperature is set between 120°F and 140°F for ideal performance.
- Calibration: Verify that the thermostat accurately reflects the water temperature. If it’s off, it might need recalibration.
- Power Connection: Make sure the thermostat is properly connected and receiving power.
- Faulty Thermostat: Look for signs of wear or damage. A malfunctioning thermostat may need replacement.
- Reset Button: If available, press the reset button to restore factory settings, which can help resolve any erratic behavior.
Taking a moment to inspect these settings can save you time and hassle, possibly getting your water heater back on track without further repairs. If your system continues to have problems or is nearing the end of its lifespan, consider exploring water heater replacement options to ensure reliable hot water for years to come.
Examine the Circuit Breaker
After checking the thermostat settings, the next step is to examine the circuit breaker for your water heater.
Start by locating your home’s electrical panel, usually found in a basement, garage, or utility room. Open the panel and look for the circuit breaker associated with the water heater. If it’s tripped, the switch will be in the middle position or flipped to the off position. Simply push it back to the “on” position.
If the breaker trips again, it might indicate an underlying issue, like a short circuit or overload. In that case, it’s best to consult a professional. Additionally, check for any signs of wear or damage on the breaker itself.
Ensuring your circuit breaker is functioning properly is essential for your water heater’s performance and safety.
If all looks good, you can move on to the next troubleshooting steps.
Flush the Tank to Remove Sediment
Flushing the tank of your water heater is crucial to remove sediment buildup that can affect its efficiency. Regular flushing not only prolongs the life of your unit but also guarantees you get the hot water you need without interruptions.
Let’s go over the steps to properly flush your tank and keep it running smoothly.
Importance of Regular Flushing
Regularly flushing your water heater is vital for maintaining its efficiency and longevity.
Over time, sediment builds up in the tank, which can lead to various issues such as decreased heating efficiency and increased energy costs.
By incorporating regular flushing into your maintenance routine, you can enjoy several benefits:
- Improved efficiency: Keeps your heater running at peak performance.
- Increased lifespan: Reduces wear and tear on components.
- Lower energy bills: Minimizes energy consumption by improving heating efficiency.
- Fewer repairs: Prevents costly breakdowns and repairs.
- Better water quality: Guarantees cleaner, healthier water for your home.
Make flushing a priority, and you’ll considerably improve your water heater’s performance and reliability. For persistent issues or professional maintenance, reliable water heater repair services can ensure your system operates at its best.
Flushing Procedure Steps
To guarantee your water heater operates efficiently, it’s essential to flush the tank periodically to remove sediment buildup.
Start by turning off the power supply and the cold water inlet valve. Connect a garden hose to the drain valve at the bottom of the tank, directing it to a suitable drainage area. Open the drain valve and let the tank empty completely.
Once drained, briefly turn on the cold water inlet to stir up any remaining sediment, then drain again. Repeat this process until the water runs clear.
After flushing, close the drain valve, disconnect the hose, and refill the tank by reopening the cold water inlet. Finally, restore the power supply and check for any leaks.
Test the Heating Elements
Now that you’ve flushed the tank, it’s time to test the heating elements.
Start by identifying the type of heating element your water heater uses, then grab a multimeter to check for continuity.
If you find any faulty components, you’ll need to replace them to restore hot water flow.
Identify Heating Element Type
How can you determine the type of heating element in your water heater? First, check the manufacturer’s label on the unit; it usually specifies whether it’s a single or dual-element system.
If the label isn’t clear, look for the following characteristics:
- Shape: Are the elements straight or coiled?
- Material: Is it stainless steel or copper?
- Size: Measure the diameter and length of the elements.
- Power Rating: Check wattage, often found on the elements themselves.
- Location: Note if the elements are located at the top, bottom, or both.
Identifying the type of heating element helps you know what parts you’ll need for repairs or replacements, making the process smoother.
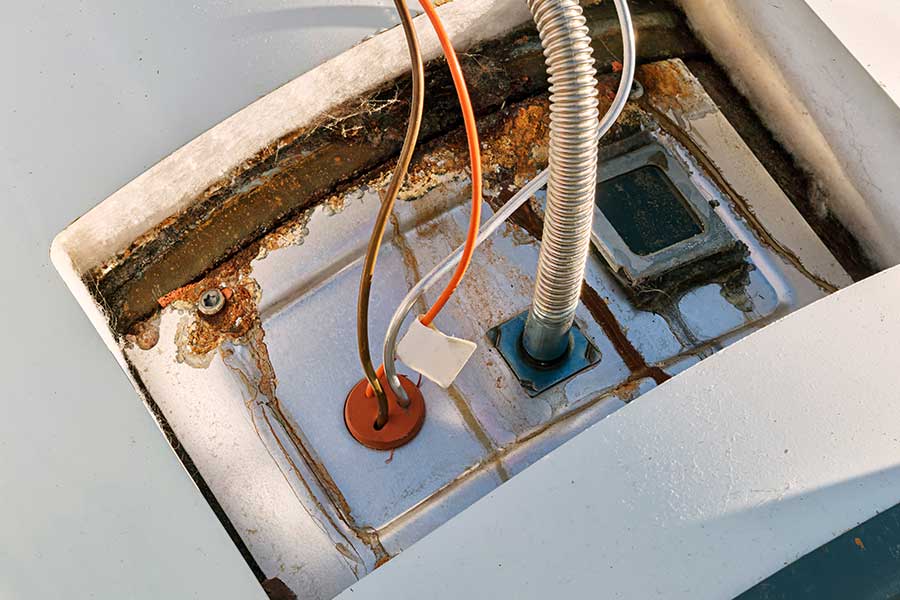
Use a Multimeter for Testing
Before you plunge into testing the heating elements, confirm your multimeter is set to the correct ohms setting. This step is vital for accurate readings.
Next, disconnect the power to your water heater to guarantee safety. Once you’ve done that, remove the access panel to expose the heating elements.
Touch the multimeter probes to the terminals of each element. If the multimeter displays a reading between 10 to 30 ohms, the heating element is functioning properly. A reading of infinite resistance indicates a broken element.
Take your time during this process; it’s important to verify all connections are secure and clean. Accurate testing will help you identify any issues before moving forward with repairs.
Replace Faulty Components
Once you’ve confirmed that the heating elements are faulty, it’s time to replace them. This process isn’t too complicated, and with the right tools, you can handle it yourself.
Start by turning off the power to the water heater and draining the tank. Next, remove the old heating elements carefully, taking note of their orientation.
When installing the new elements, make certain to:
- Use a wrench to tighten them securely.
- Check the rubber gaskets for any wear.
- Reconnect the wiring exactly as it was.
- Fill the tank with water before turning the power back on.
- Test the water temperature after a few hours to verify everything’s working properly.
Taking these steps will help restore your water heater’s functionality. For more advanced systems, consider upgrading to tankless water heater installation for improved energy efficiency and an endless hot water supply.
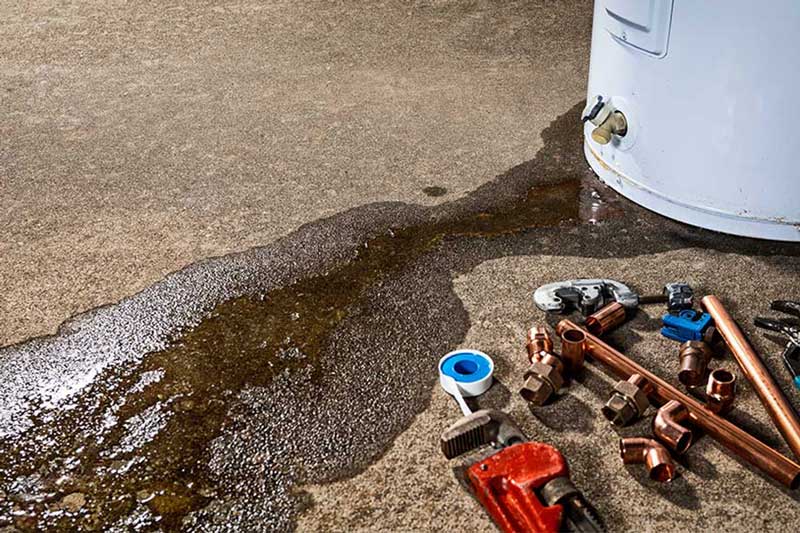
Look for Leaks and Corrosion
Identifying leaks and corrosion is vital for maintaining your water heater’s efficiency and longevity.
Start by inspecting the area around your water heater for any signs of moisture or puddles. Check the connections, valves, and tank for any water seeping out. If you notice any leaks, it’s important to address them promptly to prevent further damage.
Next, look for rust or corrosion on the tank’s surface. If you see any, it’s a sign that the tank may be deteriorating, which can lead to leaks. Shine a flashlight on the tank and check for any discolored spots or flaking paint.
If you find significant corrosion, it might be time to evaluate a replacement.
Regular maintenance and inspections can help you catch these issues early, ensuring your water heater runs efficiently and lasts longer. Keep an eye out for these problems to avoid costly repairs down the line.
Call a Professional for Complex Issues
When facing complex issues with your water heater, it’s crucial to call a professional rather than trying to tackle the problem yourself.
DIY repairs can lead to further damage or safety hazards. Skilled technicians have the knowledge and tools to diagnose and fix intricate problems efficiently.
Here are some reasons to reach out to an expert:
- They can accurately assess the situation and determine the root cause.
- Professionals have access to specialized equipment that you may not have.
- They can handle gas lines and electrical components safely.
- Experts guarantee compliance with local codes and regulations.
- You’ll save time and stress by letting someone experienced take charge.
Know When to Seek Expert Help
So, if your water heater’s staging a rebellion, don’t panic! Just follow these tips, and you might just save yourself from a cold shower or a surprise indoor swimming pool. Remember, you’re not a contestant on a DIY reality show—sometimes, calling in the pros is the smartest move. After all, you wouldn’t want to turn your home into a water-themed amusement park, right? Keep it dry, keep it safe, and let the experts handle the heavy lifting! Need professional water heater repair or replacement? Contact Friar’s Plumbing, Heating & Air today for fast, reliable service from licensed technicians who will get your hot water flowing again in no time.